Using the Self-Serve Dremel Printers
(See also our page on the Harvard wiki: 3D Printing Tutorials – Harvard GSD Fabrication Lab – Harvard Wiki)
- Account Creation
- Preparing STL file
- Uploading STL to 3D PrinterOS
- Slicing
- Loading Material
- Leveling
- Printing
- Removing Print
Account Creation
- Go to https://cloud.3dprinteros.com/ssosaml/harvard/auth and to log-in to “Harvard University” with SSO, using your Harvard Key.
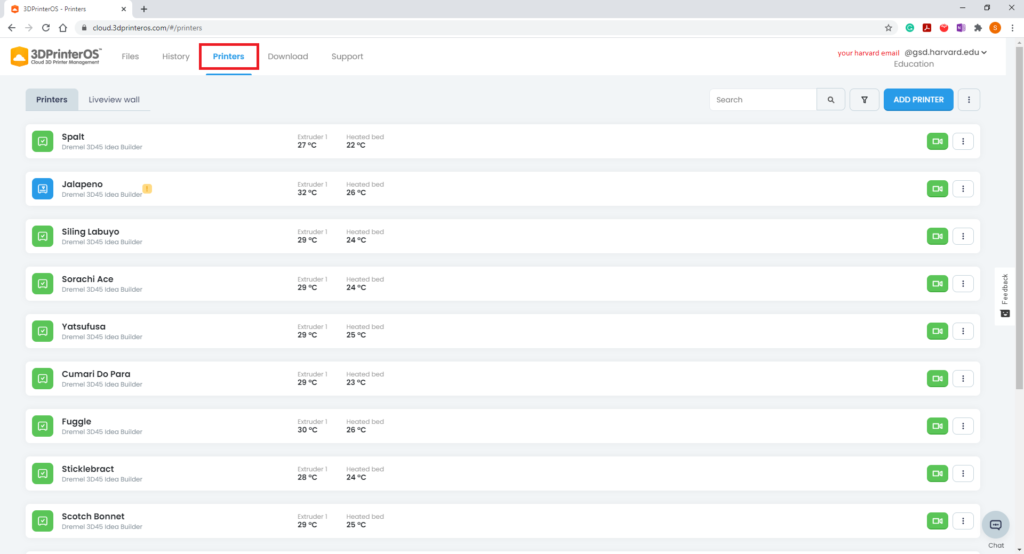
- Once logged-in you should have access to all of the printers at the GSD. You can verify this by clicking on ‘printers’ to view a list of all printers.
- Individuals who are either term-billable (students) or have authorization to use a 33-digit billing code (for some courses, research, or administrative departments) will see additional “Billable” devices.

Preparing STL file
Prepare geometry in Rhino (or Other CAD application)
- Make sure your design is smaller than the maximum print area for the Dremel L=10″ (254mm) x W=6″ (154mm) x H=6.7″ (170mm)
- Convert your NURBS geometry to a Mesh, and ensure that the mesh is watertight, with manifold edges and unified mesh normals.
- Convert the model to millimeter units
- Export model as .stl file
Uploading STL to 3D PrinterOS
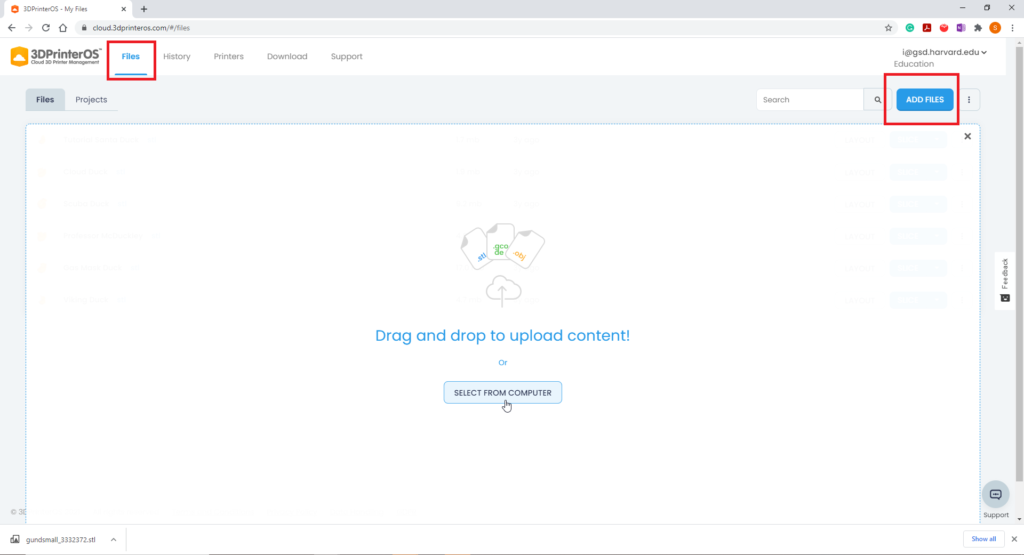
- Click “Files” -> “Add Files” to prompt the upload window.

2. Once the upload window opens, click “SELECT FROM COMPUTER” or drag and drop your file in the window.
Slice File in 3D Printer OS
- Upload STL to 3D PrinterOS: Click “Files” -> “Add Files” to prompt the upload window.

- Once the upload window opens, click “Select from Computer” or drag and drop your file in the window.
- Go to “MY FILES“. Select “Add Files” and choose your .stl file.
- Select “LAYOUT” to orient your model within the printer bed.
- You can move, rotate, and scale the model using the buttons along the top of the screen.
- Use the “On bed” button to ensure that your model is touching the print bed.
- Position the model towards the center of the print bed and select “Save“.


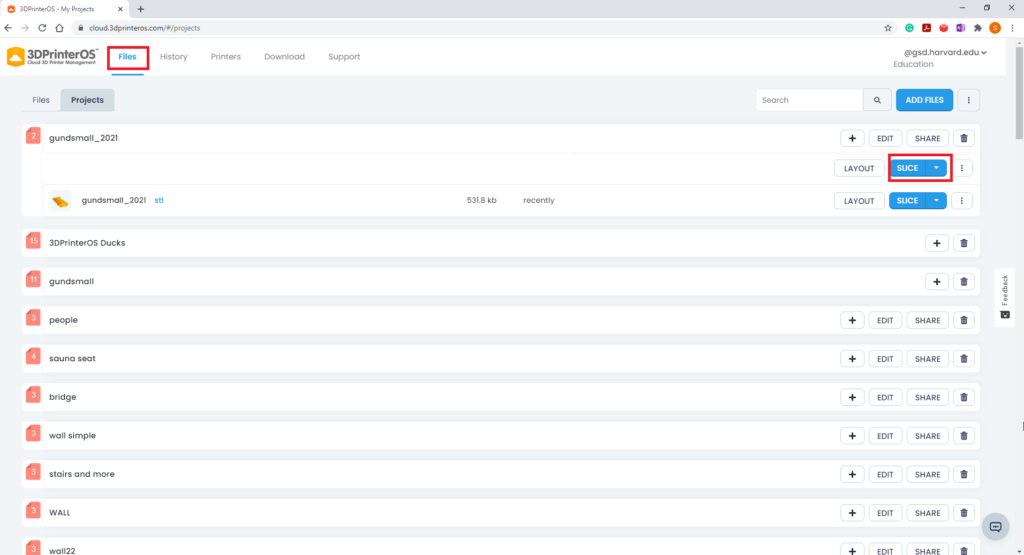
- You will now see a new, edited .stl file created under “MY PROJECTS” containing your positioned model. Make sure to select the positioned file, which will have the most recent date/time stamp. Select “SLICE“.

- Choose “Slice” from the right-side of the project to choose “Slicer 5”.

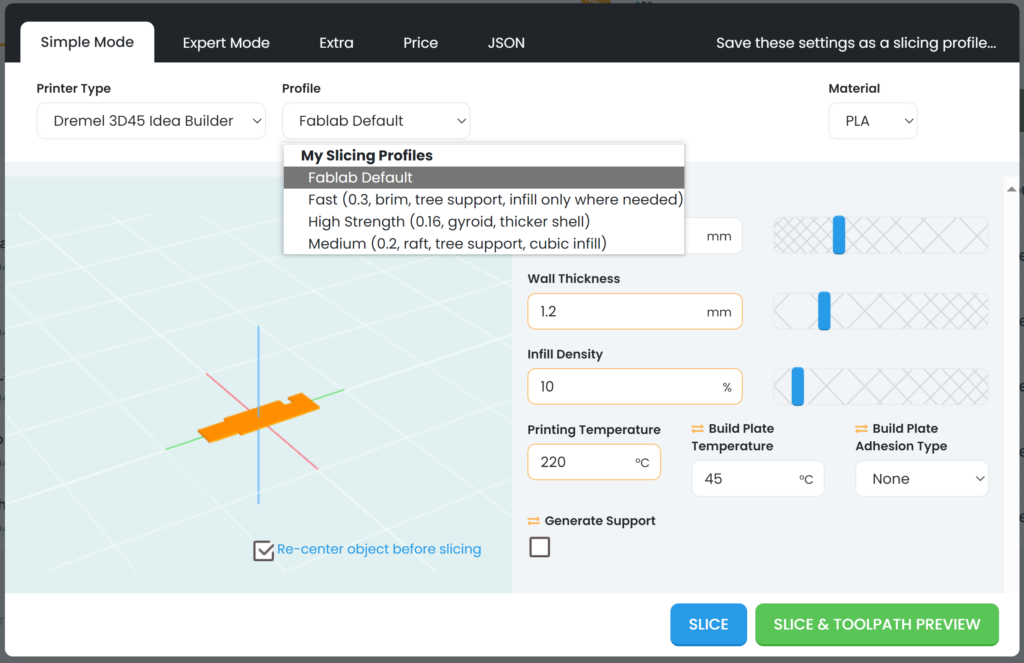
- From the Slicer Window, choose an appropriate “Profile”.
- Confirm all settings and ensure the Material selected is “PLA”.
- Choose “Slice & Toolpath Preview” to generate the G-Code and inspect the path for both support and model material that will result.
Slicing Profiles
The “FabLab Default” should work for most needs. Consult the Harvard Wiki for more information about the other profiles available.
Loading Material
- Place your spool of filament on the spool holder.
- Guide filament into the feeder tube and pull out the other side inside machine, guiding towards extruder.
- Select “Filament” and then “CHANGE FILAMENT” on the printer screen. Follow the instructions to remove any filament remaining in the extruder, by lifting the top door and cutting it.
- Once the machine has preheated, it will prompt you to “FEED FILAMENT.” Feed the free end of your filament (coming from feeder tube) into the top of the print head. Make sure the filament goes far enough in to get caught by the gears, then hit the arrow button to go to the next screen.
- The extruder motor will load filament. Select “DONE” once you see your filament coming out of the extruder.
- When prompted to select filament type, select “NON DREMEL” from the touchscreen menu. Then, hit “ACCEPT.”
- Select “SAVE”.
Leveling
- Ensure the build plate is clean and prepared for printing, removing any debris by washing the plate and applying a new layer of glue stick. (We do not recommend using masking tape.)
- Place the Dremel build plate in position by fitting the back part of the plate in the 2 metal brackets located behind the bed and snap build plate into position, making sure both tabs are secure.
- Choose “Level” from the printer screen. The automatic leveling procedure will begin.
- Follow the on-screen prompts, adjusting the height of the build plate by turning the blue knob in the indicated direction.
Printing
- You will now see a new file ending in “.gcode” under your project tab in 3D Printer OS. Select “PRINT”, and choose one of the Dremel printers.
- A window will appear showing the printer you’ve prepared with filament and build plate. This will download the .gcode and heat up the extruder/platform to prepare for printing.
- At the printer, you will now see your project on the screen. Select “CONTINUE” to begin the print.
- Monitor the progress of your print through the camera stream or by visiting the device frequently. As a courtesy, Technical Assistants may notify you if the print is failing, but you are expected to monitor it yourself and respond promptly as necessary.
Removing Part
- Once the part is complete, the platform and extruder will return to their resting positions and the screen will prompt you to clear the build platform.
- Remove your build plate from the machine by undoing the two black clasps from the front of the platform.
- Remove your filament by cutting it close to the top of the extruder.
- Keep your filament tightly wound, and in a sealed container when not in use.
- Remove support structures as necessary. All PLA that is unpainted and unglued can be discarded in specially-marked waste bins, for specialized recycling.
The Fabrication Lab is intended for the use of the faculty, staff, and students enrolled in courses at the Graduate School of Design pursuing academic work. Please see our Policies page for more information.
