Using the Bambu X1 Printers
[These printers are currently in a trial phase where access is limited to Fabrication Lab Technical Assistants.]
The GSD has two Bambu X1 Carbon 3D printers that are setup to print PLA filament in up to four colors. Please read this tutorial in full to understand the Bambu’s capabilities and operability.
While the GSD’s Objet 260 (resin printer) can print in grayscale at very high resolution (as well as mixed durometer and transparent materials), the Bambu printers can print in colors besides grayscale and at a lower cost than the Objet while still achieving impressive resolution.
Because they are limited in availability, the GSD’s Bambu printers are only for multi-color prints. (Single-color parts should make use of the self-serve Dremel 3D printers.)
These machines are run by Fabrication Lab Technical Assistants (TAs) only. You will slice your model in Bambu Studio, creating a .3mf file. You will then attach this file when you submit the job using the FabJob App. TAs will review your file and either approve it or send it back with notes toward fixing the file. After your submission is approved, you will receive a message containing the cost estimate and time needed to complete the job. You must then approve the cost and timeline before we will proceed to schedule and print the part(s). Only approved and scheduled jobs will be printed.
Installing Bambu Studio
Download the latest version of Bambu Studio from bambulab.com/en/download/studio.
Windows Installation Instructions
- Find the downloaded .exe file. Right-click on it, then click “Run as administrator.”

- A dialog box will ask if you want to allow this program to change your computer; click “Yes”. When the Bambu Studio installer appears, click through to the end: Next > Agree > Install > Next.
- In the next dialog box, we recommend leaving only the “Run Bambu Studio” and “Associate .3mf files” boxes checked. Click “Close”.

Note: If you already use Cura or another slicing program, leaving the second box checked will reassociate your Cura files with Bambu Studio. If you don’t check the second box, to open a Bambu 3mf file, you’ll need to right-click on it, hover over “Open with,” then find Bambu Studio and click on it.
- When Bambu Studio starts, set your region to North America. You can participate in the data sharing program or not.
Mac Installation Instructions
- Install the downloaded file
- Follow the configuration instructions below
Configuring Bambu Studio
- In the “Printer Selection” window click the “Clear all” button. Then, check the box next to “0.4mm nozzle” under “Bambu Lab X1 Carbon”. Make sure no other printers or nozzle sizes are selected, then click “Next”.

- To select the filament types you’ll work with, click on the “Clear all” button, then check the boxes next to the following filaments:
- Bambu PLA Basic
- Bambu PLA Marble
- Bambu PLA Matte
- Bambu PLA Metal
- Bambu PLA Silk
- Bambu PVA
- Bambu Support for PLA
- Generic PLA
- Make sure no other filament types are selected, then click “Next”.

- Unless you have your own Bambu printer, you won’t need to install the Bambu Network Plugin or create an account to login to Bambu Studio. Whether you want to do these things is up to you, and won’t affect your ability to print at the GSD.
- Choose the Template File that corresponds with your part needs (either with or without supports). These template files include slicing presets and other settings that will allow you to make the most of the X1.
- The following steps will guide you through considerations to fine-tune settings according to the needs of your specific part.

Choosing a Build Plate
You can choose between textured and smooth build plates. The difference in texture only affects the first layer (the bottom of the print).

The smooth plate will give you a surface that is smoother than the sides of the print. The textured plate will produce an even texture on the bottom surface. Stop by the laser TA office for a closer look at the textures.
STL Preparation
Geometry will be one or multiple STL files. The workflow is similar to preparing files for other 3D printers:
- Prepare geometry in 3D modeling software (Rhino, Blender, etc.)
- Make sure your design is smaller than the maximum print area for the Bambu: L=256mm (10.08″) x W=256mm (10.08″) x H=256mm (10.08″)
- Convert the model to millimeter units
- Convert your NURBS geometry to a Mesh, and ensure that the mesh is watertight, with manifold edges and unified mesh normal
- Export model as .stl file(s)
Importing and Arranging Geometry
Consider how your geometry will fit on the print bed. We recommend only printing one object per build plate, though this object can have multiple parts (more on this later).
Assigning Colors
You can use up to four colors per print. Note that if you are using a support material, this will count for one of your four colors. Begin by clicking the “plus” sign next to the filaments until there are four filament slots.

Assign a color and filament to each slot by clicking on each color and filament type. Make sure that the filaments you indicate are available in the lab.

There are multiple ways to combine up to four colors in a single print. You can combine multiple STL files into a single model with the Parts feature in Bambu Studio, or you can import a single STL into Bambu Studio and use its tools to indicate where you want different colors.
Multiple Polysurface Method
The main method of assigning color to a model involves exporting a separate “.STL” file for each color, then assigning the colors to the individual objects in Bambu Studio.
- For this example, we will use the maximum of four colors: red (brick), gray (mortar), white (door, frame, interior wall), and gold (doorknob). Each STL can have multiple closed solid polysurfaces, but if they overlap, they should be combined using BooleanUnion. Here, we combined all of the white solids into one closed solid polysurface, but the bricks are individual and not touching each other, so they will be exported together as a single STL (one of four). You should also ensure that the different colors don’t overlap with each other (use “BooleanDifference” in Rhino).

TIP: For our purposes, laying the wall on its back is the most efficient way to print. Switching filaments is the most time-consuming part of the printing process. The fewer layers with multiple colors, the quicker the model will print.
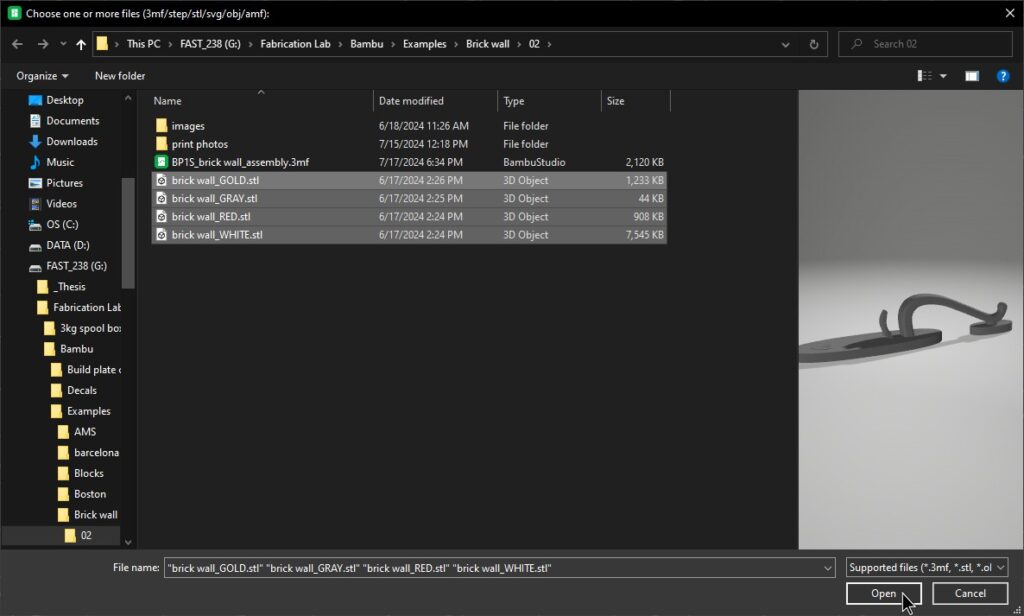
- After preparing the geometry, export the pieces as four separate STL files. We suggest naming the files according to the colors in which they’ll be printed. In Bambu Studio, click on the left-most button on the top toolbar to load your files. Locate your STL files. Ensuring all four files are selected, click “Open.”


- You will see a pop-up that asks if you want to import the files as one object with multiple parts; click “Yes.”

- Ensure that the four filaments indicated on the left of the screen are the four that you want in your model.
- On the left side of the screen, change the Process switch from Global to Objects. This will allow you to view the individual parts and assign colors (and other settings). In the menu that appears, click on the new part you just loaded, then (slowly) click twice on the colored number to its right. Choose the color you want to assign to it.

- Repeat until colors are assigned to all parts. Use Ctrl+Z to undo any step or color application.

The finished print, 3 hours later:

Single Polysurface Method
If your geometry is simpler and the color will only be assigned to a few surfaces, it may be quicker to start with a single STL. For example, this brick wall is one closed solid polysurface. We can easily export it as an STL, then “paint” the mortar joints in Bambu Studio, so that they will print with gray filament.

- Import the STL into Bambu Studio. In the Prepare tab, click on the model to select it. Then, on the top toolbar, click on the paint bucket icon. Next, select the color you would like to use. Click the smaller paint bucket just below. (The other icons on this row are other tools for painting the model; feel free to experiment with them!) Hover over the face(s) you want to paint; the faces will highlight as you hover over them. Click to apply paint. Ctrl+Z will undo the most recent click. Press the “Escape” key to exit the painting window.

- The finished print, 53 minutes later:

Slicing
After you have assigned colors to the model, it is time to slice. Slicing is the process that turns a 3D model into horizontal layers. Start with the presets, which are located on the left of the window, underneath the filaments, in Bambu Studio.
The presets are named based on their layer height and quality of print outcome. Besides the filament changes, layer height is another factor which contributes to print time: a greater layer height reduces print time at the cost of resolution, and a lesser layer height prints more slowly but retains the most detail.
The FabLab presets are tuned to produce high-quality prints. You will likely be successful printing with any of them, and your choice of preset should be based on considerations of print time and quality. Try as many presets as needed to arrive at the desired balance between print time and quality.
- Locate the slicing presets on the left of the window, and click on it. A drop-down menu will appear; choose a preset from the list. (The presets that appear for you may be different from those pictured below.)

- After selecting a preset, click “Slice plate” in the top right of the window.

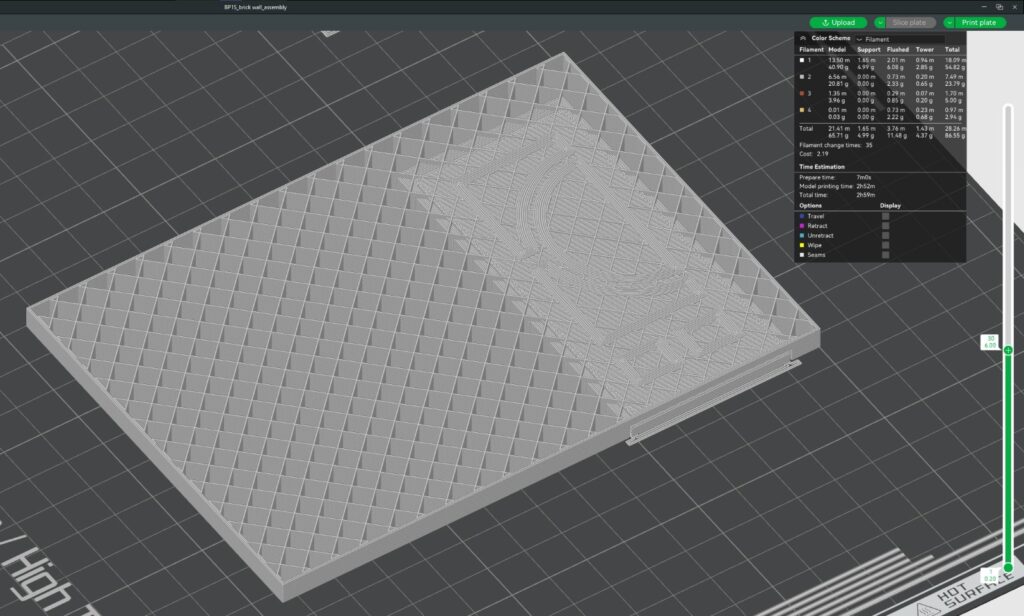
Wait for the model to finish slicing; the progress bar is in the bottom-right corner. When it’s finished, Bambu Studio will switch to the Preview tab, and deliver a preview of the sliced model, as well as estimates for print time and filament used:

- The representation of the model in the Preview tab shows what the finished print will look like. Use the vertical slider on the right to cut away layers and see inside the previewed model: slide the top button down to remove layers from the top, or slide the bottom button up to remove layers from the bottom. Check whether the infill is as you want it (density, pattern, etc.), and adjust the settings as you like. Click here for more information about infill. (Bambu Studio refers to infill as “sparse infill.” Its settings can be found under “Strength,” on the left side of the window.)

- You will need to re-slice after changing any setting. You can slice as many times as you need to achieve your desired balance between quality and print time.
Tip: After slicing, let’s compare the estimated print times for two orientations of the simple brick wall: one laying on its back, and one standing up. The model on its back requires the printer to change filament 9 times, for a print time of 53 minutes; standing up, 256 filament changes are required, increasing print time to over 9 hours.


Support
Models with overhangs may require support. Bambu Studio does a good job of estimating which areas need support. If, after slicing, you see this warning in the bottom-right corner of the window, then it’s a good idea to turn on support:

- Locate the “Support” tab on the left side of Bambu Studio. Click the box next to “Enable support,” which will allow you to change the support settings.
Support Types
- Click to expand the drop-down menu next to “Type.”

- The two main types of support are Normal and Tree. Normal supports automatically detect which areas need support, then project those areas downward and create a regular support pattern. Tree supports identify overhang “nodes,” rather than regions, then create branching supports up to the nodes.

Left: Tree supports (6.6g, 25 min), Right: Normal supports (10.36g, 24 min)
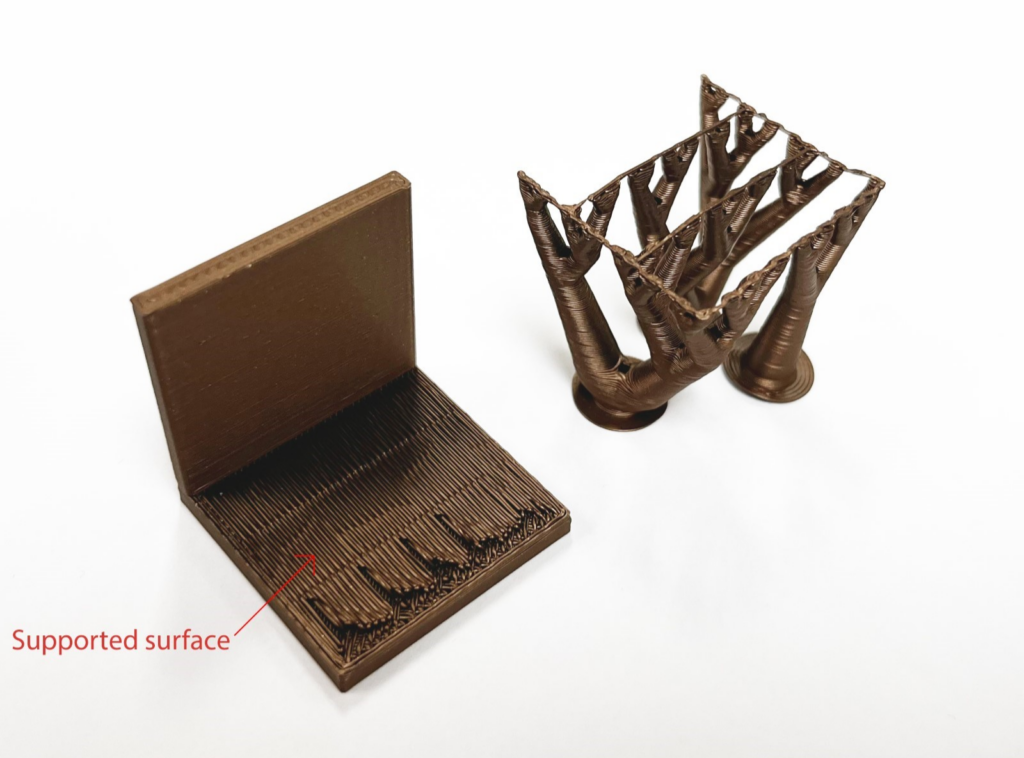
- On the Bambu printers*, the two types of supports have comparable print times, but tree supports use significantly less material (see caption above). Tree supports are also typically easier to remove from the print, because they contact the print in fewer places. But, for the same reason, they sometimes cause defects in the supported surface. See below:


*On most other printers, tree supports offer reduced print time, but the Bambu printers can print normal supports as fast as trees.
Support Materials
- We offer two materials to enhance support performance: Bambu Support for PLA (Sup.PLA), and PVA. Sup.PLA is softer than regular PLA, and pulls off more easily. PVA is dissolvable in water and can be used for models whose support would otherwise be difficult or impossible to remove. Things to keep in mind:
- If you choose one of the support materials, it will count for one of the four colors in your print (max 4 per print)
- Using support materials will increase print time, because the printer has to change filaments
- These should only be used for support that would otherwise be difficult or impossible to remove
- Support for PLA (Sup. PLA)
- We recommend using Sup.PLA only on support interfaces (the regions where the supports touch the model). This reduces the amount of filament changes and support material used, while making the supports easy to remove.
- Designate the fourth filament slot as Bambu Support for PLA:

- Find “Filaments for Supports” in the Support tab. Click to expand the drop-down menu next to “Support/raft interface.” Click “Sup.PLA.” A pop-up will ask if you want to automatically change some other recommended settings; click “Yes.”


Left: Normal supports (10.4g, 24 min), Right: Normal supports with Sup.PLA interface (17.2g, 40 min)

Left: Normal support, Right: Normal support with Sup.PLA interface. This method produces high-quality overhang surfaces but increases print time and filament usage.
- PVA
- PVA is soluble in water and is best used in delicate models where removing the support would risk damaging the model or would otherwise be impossible
- Repeat the steps for Sup.PLA, substituting “Bambu PVA” for “Sup.PLA”
- You can have the PVA only at the support interface or have all support be PVA. Please note having all support as PVA will significantly increase print time.
- To do this, repeat the material selection step on the setting above, called “Support/raft base,” so that the screen looks like this:

- You can dissolve the PVA in warm water, at home, or in the lab (depending on availability). The lab has a bath that you can use; ask a TA for help using it. Please note that there may be a line to use the lab’s bath. At home, a good option is to put a sous vide stick into a water-filled bucket.
- To learn more about PVA, please see this help document from Bambu lab.
Submitting a Job
Jobs for the Bambu printers are to be submitted through the FabJob App and are on a queued basis with sensitivity to print length. We recommend you submit your job a week before you need them to accommodate post-processing time and geometry issues.
- Launch the FabJob App. Click on “Multi-Material Printer,” then “New Job”
- In the “Printer Type” drop-down menu, select one of the “Bambu” printers.
- Attach the .3mf file you created in Bambu Studio. Specify your selected colors/materials, plate, and part dimensions.
- After submitting, click the “Notify Us” button. After a TA reviews your file, you will receive a message from the App saying either: “Your job was returned” and some advice about fixing the file, or “Your job was approved” with a cost estimate, must Approve the estimate for your job to be scheduled
- Jobs are reviewed in the order of submission and printed according to the schedule.
- Have a plan for adversities, as 3D printers can fail and break. You will receive a message on Teams in the event of any problem with the printer or the job
- After the print has finished, you will receive a message from the App saying, “Your job is ready for pick up”, and you can retrieve it in the laser cutter TA office
The Fabrication Lab is intended for the use of the faculty, staff, and students enrolled in courses at the Graduate School of Design pursuing academic work. Please see our Policies page for more information.
